

There’s lots of information in this post, so grab your beverage of choice and settle in! I’m sharing a Stamping Bella card with Polychromos coloured pencil colouring. I’m also sharing my thoughts on the best pencil sharpeners for keeping those coloured pencils sharp and ready to rock your images!
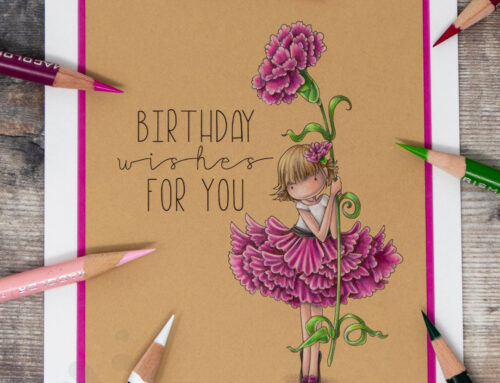
Balloonabella in Coloured Pencil Card:
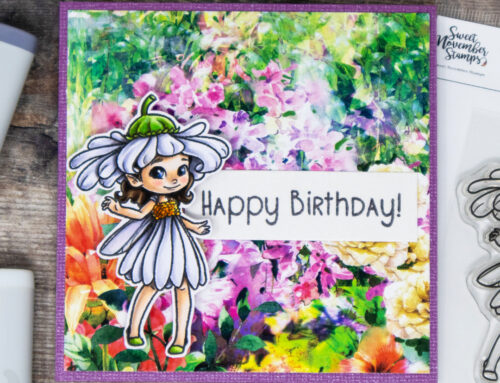
I coloured the gorgeous Balloonabella from Stamping Bella using Polychromos pencils – you will find all the details below including a list of full list of the colours used.

Stamp used: Stamping Bella Balloonabella (incl. sentiment)
Note: If you’re in the UK you can find Stamping Bella stamps at Dies to Die For.
The image was coloured with Faber-Castell Polychromos Pencils* (also available at Jackson’s Art* including open stock) on Strathmore Bristol paper (Vellum Surface)* (also available at Jackson’s Art*).
Other supplies: Distress Inks, Lawn Fawn Stitched Circle and Square die sets, Ranger Archival Ink Jet Black.
Polychromos Pencils Used:

Colouring using Coloured Pencils:
If you would like to see how I colour using coloured pencils, you can watch the video below or in HD over on YouTube.
In the video above you will see exactly how I approach the process of colouring a stamped image using coloured pencils.

Pencil Sharpeners for Coloured Pencil:
I wrote a post earlier this year sharing my opinion on two popular coloured pencil brands: Faber-Castell Polychromos and Prismacolor Premier. You can read that post here: Colouring with Polychromos Pencils Vs Prismacolor.
One of the main concerns when colouring with coloured pencils is sharpening them. Maintaining a nice sharp point is key in achieving great results and one of my main frustrations with the Prismacolor Premier pencils has always been sharpening them. With that in mind, I’ve been playing with pencil sharpeners!
I have acquired several different brands of pencil sharpener in my quest for THE ONE!

Note: the traditional art of sharpening pencils with a knife is not on my list of options, not least because I am relatively clumsy. 😉
In my current collection of sharpeners, I have the following:
Faber-Castell Trio Tub Sharpener*: great for the Polychromos pencils and many others, but not so good for the Prismacolor Premier pencils in my experience.
Staedtler Noris Club Tub Sharpener*: pretty good, and does a great job on most pencils. Variable with the Prismacolor pencils.
Sanford Prismacolor Sharpener*: I found this sharpener seemed good initially, then after several pencils the same old problems started to occur.
All of these sharpeners retail at around the same price as my two favourites below, but are not in my opinion, anywhere near as good. Unfortunately, while you might expect a sharpener from the same company that manufacture the pencils to be up to the task, that doesn’t seem to be the case. I’ve provided links for all the sharpeners above, but I don’t really recommend them. Of the three, the Faber-Castell and Staedtler sharpeners are better than the Prismacolor, but the two I’m about to share offer far better quality and value.
The Best Pencil Sharpeners:
Two strong favourites have emerged and earned a permanent place on my desk. Both of these do a fantastic job on both the more durable Polychromos pencils and the softer, breakage prone Prismacolor Premier pencils. NOTE: it is now 2020 and I am still using both of these pencil sharpeners.

KUM Automatic Long Point Pencil Sharpener*(Amazon): this one has two holes. One side shapes the wood and the other side shapes the lead, giving you a nice long point. There is an automatic stop, so you don’t go too far. This sharpener also comes with two replacement blades in the back of the case. There are also holes on either side for pointing the leads on mechanical pencils.
This one needs a little practice to get used to the lead shaping step. You need to be quite gentle, and at first it might feel like it isn’t doing anything, tempting you to put a little more pressure on. Give it a few turns and you will start to feel it working – putting more pressure on will lead to the point breaking and you will need to start over again.
Mobius & Ruppert Solid Brass Twin Wedge Pencil Sharpener*: this German made pencil sharpener just beats out the KUM Automatic to take my top spot. It is a fantastic quality pencil sharpener, and creates a beautiful point with ease in just one step as opposed to the KUM sharpener’s two step approach as described above. The length of the point is very similar to that achieved with the KUM. This sharpener is also very easy to clean due to the nice open space around the blade edge. ( Alternative Link – Jackson’s Art*) Replacement Blades can be purchased HERE .
Pencil Sharpener Tips:
Replace your blades! Keep some sets of spare blades on hand. A sharp blade is really important in making sure that your pencil sharpener functions well. If the blade is getting old and dull, it will chew up the wood and put stress on the pencil core. So, if your pencil tips are looking a bit ragged and the point keeps breaking in the sharpener – try a new sharpener or if possible simply change the blade!
Cheap pencil sharpeners can be great at first, but the blades dull quickly. I prefer to use a more expensive sharpener with replaceable blades. If you consider the cost of wasting expensive pencils compared to the cost of buying a quality sharpener and replacement blades, the choice seems obvious!
Turn the sharpener, not the pencil! Hold the pencil in your non-dominant hand and turn the sharpener, not the pencil. This helps you to avoid putting too much pressure on the pencil when sharpening (it’s also a bit easier on your hands, I find). This technique is one of the reasons I prefer the Mobius & Ruppert sharpener to the KUM Automatic Long Point, since it is easier to hold and turn.
Final Note:
While I still prefer the quality of the Polychromos pencils (and wish that Prismacolor would improve the quality of their wood casing, and quality control overall), the Prismacolor pencils still have a place in my “toolbox” because of the positive differences they have from the Polychromos pencils (opacity, colour range, price). Now that I have found a way to sharpen them without so much stress, I’m more likely to reach for the Prismacolors and use them in conjunction with my other pencils. I’m hoping this post will help you too!
Thanks for stopping by!
I hope you have enjoyed today’s post as much as I enjoyed creating it for you.
Don’t want to miss out on future posts? Subscribe to my RSS feed in your favourite blog reader or subscribe to my email newsletter.
Follow me over on Instagram where I share frequent peeks at the colouring I’m doing along with other day to day snaps. You can also follow my page on Facebook if you’d like to connect over there. Subscribe to my channel on YouTube (and hit the notification bell over there to make sure you don’t miss out on updates).
Help support this blog and my work directly – become a patron over on Patreon.
Any and all support you give, whether it simply be liking a video or social media post, commenting here on blog posts, purchasing via affiliate links or giving direct support through Patreon, is greatly appreciated.
Please note that in order to assist with the running of this blog I do use affiliate links from time to time and there may be some in this post, denoted with a *. Please see my About Me page for more information.
In my capacity as colourist and design team member for Stamping Bella, I do receive the stamps I use from them. All opinions and creative decisions remain my own, and I only work with companies/use products that I love.
Leave A Comment