
I’m delighted to be sharing today’s post as a guest designer for the new Purple Onion Designs stamp release! I’ve been a fan of their stamps for years, as I love Stacey Yacula’s illustration style, so I’ve been having a LOT of fun with the new release.
Purple Onion Designs – Sunny Meadow Fair Collection

The scene building fun to be had with this collection is endless, especially mixing things up with older collections. I’ve already created several little scenes that I’m looking forward to sharing with you. The good news is that from release day today 1st May 2019 until 15th May 2019 you can get a whopping 30% off if you purchase the entire collection HERE. I know I’m a “gotta have it all” kind of girl, so I love it when stamp companies make that decision easier! You can of course purchase all the stamps individually too HERE.
Time to share my first card with you, along with details of the Copic markers I used to colour the scene.
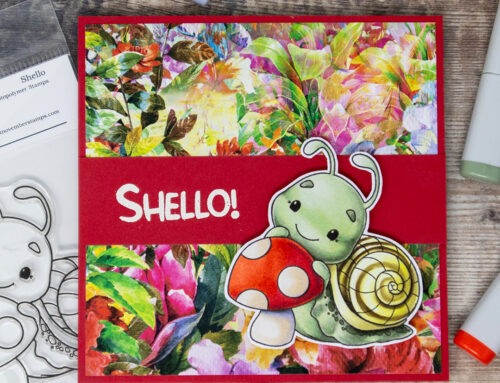
Pinky & The Cotton Candy Cart Scene Card

Stamps Used: Pinky (pig), Cotton Candy Cart, Fairgrounds Background, Carnival/Fair Marquee Sentiments, Fair Accessories
I had an absolute blast creating scenes and colouring them. Totally in my element. I stamped the foreground elements in my favourite black ink for use with Copics (MFT Extreme Black), then stamped the background using a softer grey ink to help it read as being further away. This is a really simple way to help give the impression of distance, along with keeping the colours in the background less vibrant.
The scene was stamped on my preferred paper for Copic colouring – Make it Colour Blending Card.

I used one of the stamps from the Fair Accessories set to stamp one of my cardstock layers to create some additional interest on the card front.
NOTE: remember when you are creating a masked and stamped one layer scene, to work from the foreground back. Stamp whatever you want to appear at the front first, then mask and work backwards from there.
Copic Markers Used:
Sky B0000,B000,B00 Clouds T0,T1,T3
Grass YG11,YG13,YG17,G07,BG93 Trees E35,G43,G46 Bushes G40,G43,BG93
Cart E40,E42,E43, BG23,BG34,RV63,RV55 Cart Canopy W00,W2,W4,RV63,RV55
Cotton Candy RV52,RV55 Pinky (pig) R30,R11,R32,BV31
Tents T0,T1,T3, RV52,BG32,BG34
Thanks for stopping by!
I hope you have enjoyed today’s post as much as I enjoyed creating it for you.
Don’t want to miss out on future posts? Subscribe to my RSS feed in your favourite blog reader or subscribe via email using the form over in the sidebar.
If you want to keep an eye on what I’m colouring on a daily(ish) basis, follow me over on Instagram where I share frequent peeks at the colouring I’m doing along with other day to day snaps. You can also follow my page on Facebook if you’d like to connect over there.
Please note that in order to assist with the running of this blog I do use affiliate links from time to time and there may be some in this post, denoted with a *. Please see my About page for more information.
The stamps used to create today’s card were provided by Purple Onion Designs. As always my opinions remain my own and I only share products that I love.
Leave A Comment