
Join me today for a bit of a recap on Copic colouring and shading red, including some tips and tricks, a pinnable guide and some crafty inspiration!

Copic Colouring and Shading Reds:
With Christmas crafting well underway for most people, and all the new festive stamps being released, it seems like the perfect time to revisit the topic of Copic colouring and shading reds!
Reds can be tricky to work with, and I often see crafters asking for help in blending and shading reds.
Copic Reds and Colouring With Them:
There are lots of different tones in the Copic R family. They range from light pinks to deep reds. Some of the colours have a cooler tone, some a warmer tone. Some are pinkish, some more orange. The markers you choose to use on your project will very much depend on your personal preference and the object you’re colouring.

I tend to gravitate toward one particular Copic Red Combo: R35,R46,R59. This combo works particularly well as a nice deep, rich red for Christmas. This is possibly because my personal preference tends to be for reds tending towards pinkish, rather than reds with an orange tone.
Useful Colouring Tool:
Using Sandy Allnock’s Hex Chart can really help you to select reds that work well together. I use mine all the time when colouring. Because the chart groups colours by visual similarity, you can get a better feel for the colours. You can see my blog post with video on the Hex Chart by clicking through here: Sandy Allnock’s Hex Chart with Video.
Copic Reds and Shading Them:
One of the keys to colouring with Copic reds is in how you shade them to add depth and contrast. You can create a nice blend with just three red markers, but by adding extra shading with greys, earth tones, similar colours, or a complimentary colour you can up the wow factor.
Useful Colouring Tool:
If you print out a copy of the Copic Colour Wheel available on the Copic website you can easily find the complimentary shades for your chosen colours.
I’ve put together a little comparison graphic showing three of my favourite basic red combinations and different shading options for each.

As you can see, adding the additional colours for shading can make the colouring more dynamic, by increasing the contrast.
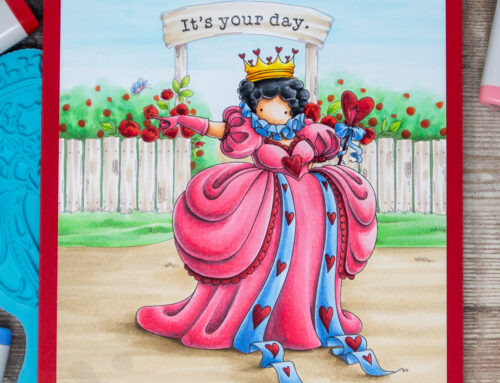
 My usual “go to” Copic red combo is R35, R46, R59, as seen on Christmasgiftabella here.
Click through here to read my blog post featuring Christmasgiftabella and a step by step guide plus video on Copic Colouring Pleats and Folds!
Highlight Colours:
As well as creating additional depth by shading using other colour families, you can create even more visual interest in your colouring with the selection of your highlight colour.
Look at my card featuring Stamping Bella Tiny Townie Casey has a Cornucopia.

If you look closely at the apples in that amazing cornucopia, you should see that I used a yellow Copic marker for the highlight area. This makes the apple look so much more lifelike, and creates some real interest in those areas of the image as the light yellow contrasts with the deeper red, while giving a warmer look than leaving a white highlight. Watch my Casey has a Cornucopia Copic Colouring Video on YouTube to see exactly how I did this.
For full details on my Casey has a Cornucopia card, visit my blog post: Stamping Bella Holiday 2016 Release Previews Day 2.
Here’s another handy graphic showing the same bauble in the sheet above, this time coloured with a yellow highlight and a deep shadow.

On the bauble, a yellow highlight gives the impression of a warm reflected light.
Copic Reds – General Colouring Tips:
These tips may help if you’re having problems colouring with reds or other rich colours. They aren’t hard and fast rules, but may assist you in “troubleshooting”.
- Use a light touch: when colouring with markers in general (and most media) I find it best to use a light hand, and this is definitely the case when colouring with reds and other richly pigmented colours. If you are heavy handed and lay down too much colour at once blending becomes more difficult, and in laying down even more ink to blend you will run in to problems with the ink bleeding over the lines. Use a light touch and lots of layering.
- Feather/flick: rather than colouring in circles, lay colour down with a flicking/feathering motion (this is how I tend to colour in general, so you can see how I do this in my videos). Don’t try to soak the paper evenly.
- Save reds till the end: if you plan on colouring other surrounding parts of your image in lighter colours, colour those areas first so that you can avoid accidentally pulling reds in to areas you don’t want them. At the same time, you may want to allow the lighter areas to dry completely before starting to colour the reds to avoid the red ink travelling into those areas.
- Avoid the lines: if you experience issues with reds bleeding over the lines even when using a lighter touch, try not colouring right up to the lines of your image. This will give the ink a “buffer zone” to move in.
- Don’t fuss with small areas: avoid trying to blend too much in small detail areas, it is almost guaranteed to end in a mess. You can get away without achieving a smooth blend in many small detail areas and avoid a headache in the process.
- Try a different paper: if you are having real difficulties working with reds, you may want to try out some different papers. Softer more absorbent papers will tend to bleed more.
- Adjust your colours: if you are having to lay down a lot of ink to blend your chosen colours, you might find tweaking the colour combo helps. Test out some alternatives and see if they play together better. The more ink you are having to lay down to achieve a reasonable blend, the more likely you are to experience issues with bleeding.
I work by adding a base layer of my lightest red shade, then using my shadow colour to lay down the shading followed by my darkest red shade, then the medium red and back to the lightest red again (I usually repeat the last two steps until I am happy). I use a light hand with each layer, and I try not to go over the darkest areas too much.
Colourless Blender & Reds:
I have seen other Copic users suggesting to avoid using the colourless blender when working with reds. This can certainly often lead to a mess, however I have found with Make it Colour Blending Card that I can successfully move reds with the colourless blender and correct mistakes/mishaps to an extent that would not have been possible with other papers I have used.
The way reds and other highly pigmented colours blend and play on the Make it Colour Blending Card is one of my favourite things about it. I have heard that XPress It paper/card is also nice for colouring with reds although it has been a while since I tried it myself.
Thanks for stopping by!
I hope you have enjoyed today’s post as much as I enjoyed creating it for you.
Don’t want to miss out on future posts? Subscribe to my RSS feed in your favourite blog reader or subscribe via email using the form over in the sidebar.
If you want to keep an eye on what I’m colouring on a daily(ish) basis, follow me over on Instagram where I share frequent peeks at the colouring I’m doing along with other day to day snaps.
Please note that in order to assist with the running of this blog I do use affiliate links from time to time and there may be some in this post, denoted with a *. Please see my About page for more information.

[…] ANOTHER treat today, check out Elaineabella’s blogpost about COPIC REDS and how to used them […]